Easy Step-by-step Instructions
This camera is an inexpensive way to get into large format photography. The negatives are big enough to print lovely silver gelatin contact prints, and can be used for alternative printing processes like cyanotype, van dyke, and kallitype. The following list includes everything needed for construction except for the film. The costs are based on prices in St. Paul, Minnesota, USA in August, 2005.
Materials
- #2 Xacto knife – 5.49
- extra blades – 2.49
- aluminum or steel straight edge (1 meter long) – 6.99
- 1 sheet black on black foam board – 4.99
- 1 sheet black on black matt board – 4.99
- wood glue or Elmers-type white glue – 1.99
- 49-52 mm step up ring – 7.99
- 52 mm lens cap – 5.99
- 2 ea – 2 inch X 4 inch Velcro hook and pile with adhesive – 3.59
- 12 inches of 1″ wide Velcro hook and pile with adhesive – 6.97
- pine molding, 1″ wide X 10†long – found in the garage
- black plastic 35 mm slide mounts – 20 ea for 3.95
- Total for above items: $55.43
- pinhole (hobby drill hole in drink can aluminum or brass shim stock)
- 4X5 inch sheet film holders (used)
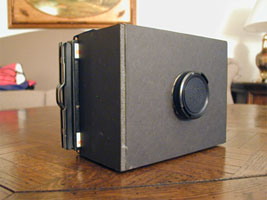
I bought the film holders for $8 each at a used camera store. They can be purchased on Ebay as well. These instructions require a 4X5 inch film holder for each step in the process. The same instructions could be followed to make a camera for other film holder sizes. I made a camera to match an old wooden 8X10 inch film holder that I bought on Ebay using the methods as outlined here. The camera illustrated here is a 75 mm focal length, which is a relatively wide angle for 4X5 film (‘normal’ focal length is about 150 mm).
Construct the camera back
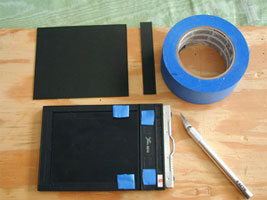
This is the most important piece of the camera, so measure carefully. The back, bottom, and sides of the camera will be constructed using a film holder for dimensions, and to help line up the pieces during the gluing process. Cut a piece of matte board to fit in the slot above the light-trap ridge on the film holder. This piece will measure slightly less than .75″ (19.05 mm) by the width of the film holder – 4.765″ (121 mm). Cut another piece the same width of the film holder. Cut the length so the matte board rests on the flat just below the light-trap ridge, and is even with the bottom of the film holder. Tape these pieces to the film holder with loops of masking tape.
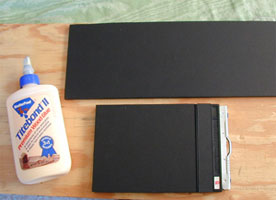
Cut a piece of foam core to exactly the same width as the film holder. Spread wood glue over the surface of both pieces of matte board. Line up the sides of the foam core piece to the sides of the matt board and clamp or weight it down until the glue sets (about 10 minutes).
Remove the glued camera back from the film holder, and trim the top and the bottom of the foam core to match the matt board. Put a new blade into the X-acto knife. Carefully cut the image hole from the matt board side. Keep the knife vertical and make the cuts as clean as possible. Congratulations! The most difficult part is done.

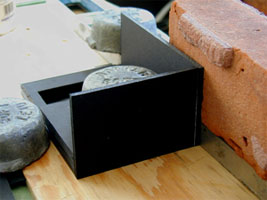
Glue on the bottom of the camera
Cut a piece of foam core to the same width as the film holder. Set up a means to clamp the bottom of the camera to the camera back (see photo).
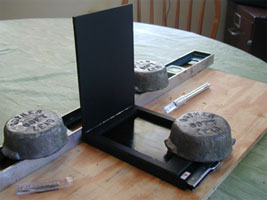
Apply wood glue to the bottom edge of the camera back. Place the film holder flat on a table, and place the camera back on top of it, with the slot lined up with the light-trap ridge. Align the camera bottom piece to the glued edge of the back, with the edge of the bottom flat against the table, even with the back of the film holder. Clamp in place for 10 minutes, or until the glue sets. Trim the camera bottom to the correct length for the pinhole to film distance that you require. The film plane will be approximately 5 mm behind the surface of the matt board that faces the film holder. On this 75 mm focal length camera, the length of the bottom piece is 83 mm.
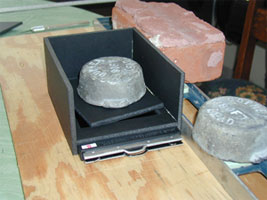
Glue on the camera sides
Cut the left and right sides of the camera from foam core. The sides will be flush with the bottom of the camera, and even with the top of the back. On this camera the side dimensions are 83 mm X 165 mm.
Construct the front of the camera
Cut the foam core even with the outside edges of the sides and bottom. Find the center of the opening in the film holder. Carefully mark and cut a hole in the foam core at this location. The hole here is 1.5†in diameter (about 38 mm). This camera includes a slot to hold a black plastic slide mount, so the pinhole can be changed.
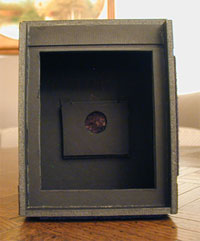
Glue the front of the camera to the sides and bottom. Install the pinhole.
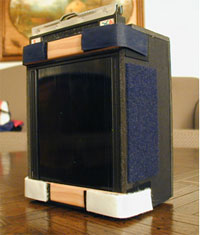
Finishing the camera
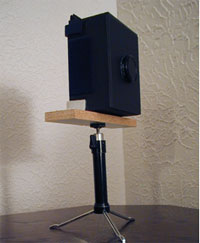
Cut a piece of foam core to match the sides and front of the camera. The back of the top will butt against the front of the film holder. Glue and clamp the top. The picture at the top of this article shows the fit of the camera top.
Epoxy a step-up ring for filters and lens cap to the front of the camera. 52 mm seems to give the best choices of used filters. Install the lens cap.
This camera is attached to the tripod by 2†X 4†pieces of Velcro on the bottom and one side of the camera. The film holder is held against the back by Velcro strips attached to 1″ pine molding strips.
Comments
29 Responses to “How to Build a 4×5" Pinhole Camera”
An excellent primer and encouragement for me to build my own 4â€x5â€, something that I have been intending to do for far too long. A bit more guidance on pin hole size might be in order though ….
Sorry, forgot to rate the story! I was going to give it 5 out of 5, but decided to knock a point off, only giving it 4 out of 5, as begineers might not appreciate the optimum pinhole size and how to achieve it for a camera of this size format possibly of a different focal length if said begineers want something with a longer focal length for less of an extreem wide angle.
Links for Pinhole Calculator and Pinhole Designer are :-
http://pinhole.stanford.edu/phcalc3.htm
http://www.pinhole.cz/en/pinholedesigner/
Tony.
Here’s a link to an article on making a pinhole:
http://unblinkingeye.com/Articles/Pinhole/pinhole.html
very well thought out and the sequence and excellent photo-illustration make it an enjoyable read
what did you use to shoot the illustrations?
Olympus digital camera.
Really well done Earl. Good organization, detailed, good illustrations. I’ve been thinking about writing an article on a different kind of Pinhole camera. You’re a good inspiration… thanks
btw… have you thought of a back modification to allow Polaroid film holders?
Good article Earl; I build my own 4×5 few months ago, and I have problems measuring the pinholes. In fact when I try to convert from the pinhole size to F/stop. Can you give a hand on this?
thanks , kathia
Andy – I don’t have a Polaroid back, but if I ever get one, I will make it work on my 4×5 cameras.
Kathia – f stop is the distance from pinhole to film divided by the aperture diameter – thus my 120 mm 4×5 camera with a .4 mm pinhole is 120/.4 or f300. You can use a scanner to measure the diameter of your pinhole. There are also relatively inexpensive magnifiers with measuring reticles available – check out the Peak Optics website.
Good morning, I would like to try to produce the camera, I need to know exactly what kind of material is the matte board.
How is possible to buy it ?
Thank you in advance.
Regards.
The matboard is standard acid-free board used for matting and framing pictures.
Thanks for posting this article. It gave me the incentive to finally get off my duff and make 4×5 camera, instead of succumbing to “temptation†and ordering a pre-made one. The directions could hardly be clearer, although I modified the plans slightly (changed the focal length to ~30mm for an extreme wide angle image and added a second layer of foam core to ensure that all edges were light-trapped and make it slightly stiffer / more durable for long-term use). Can’t wait to take it out and make some photographs—have two series of images in mind that I’m just itching to get started on! Thanks again!
—Kevin
This is great! Thanks. Question for you…You mention that the focal length is 75mm however you created the base at 83mm. Is there a formula for this? I am planning to build an 8×10 box pinhole and I’m uncertain how to measure the base for an ~210mm lens (and also looking to design a 90mm focal length for the 4×5). If
Brings back some awfully good memories. My first camera was a Kodak Brownie which took some very good pictures. I’m going to try this but need to read up a little more though. Thanks.
Look so great. My works but look like shit… 🙂
I just have to try to make a pin hole camera. This looks like a fun project – Thank you.
Great description. I’m just curious. Will the focal length be 75mm if you double everything up to 8×10″? I’m building a couple of 8×10 but can’t seem to figure out what the fstop would be. Not that good at the whole photographic maths part.
Cheers
looks great! thanks!
I asked some simple questions of a Pinhole camera maker. And he told me to look up everything on the Web. All I wanted to see were some pics from their camera [as they had extra 1″ thicknesses that cam be added to the backs] and how to judge the exposure. I just got the brush off! So I found all these calculators for film/ pinhole sizes/ f stops/ film sizes…. now why would I buy that companies stuff?
Every one on the Web was so happy to share their stuff and becausae it was the right thing to do!
Than you for this article. I am sure so many ppl are happy, like me, to see it!!
LoReaNNa (Canada)
Thanks Earl, great method and pictures, really want to make one now. And also thank you for following up and explaining bits and pieces I.e pinhole size
brilliant!
Shiam x
Hi Earl, I don’t know if you still check this, but I am an extreme beginner and have searched and searched for the “black plastic 35 mm slide mounts ” you listed as needing 20 of them. I cannot find anything that is called that anywhere. I also didn’t see in the directions where they were used? What am I missing? Thank you!
Nice artical, I wanted to try and make my own pin hole camera, but I have a question, I want to make my room into a pinhole camera. I have measured the distance from my window to the opposite wall is 71″ apart. I have currently mock up my windows with tinfoil and some news paper and now I can project a somewhat blurry image to my wall of the scene outside my window.
My question is, is there a specific diameter size of the pinhole for the film at a 71″ distance from the hole? what size hole do I need to cut to create a sharp image? thank you.
Thank you for providing knowledge about 4X5 pinhole camera, it helped me, give me some momentum, so I designed a one-piece 4X5 pinhole camera, it can quickly and easily replaced by film clip and push the button on the shutter to locate.
It has been reviewed by the patent in Taiwan if you are interested in viewing, another day I can Email pictures to you, thank you
Hello Earl, i hope all is well, i was just wondering what the image hole size is? is it 75mm…. I know this might be a really stupid question.
Thank you